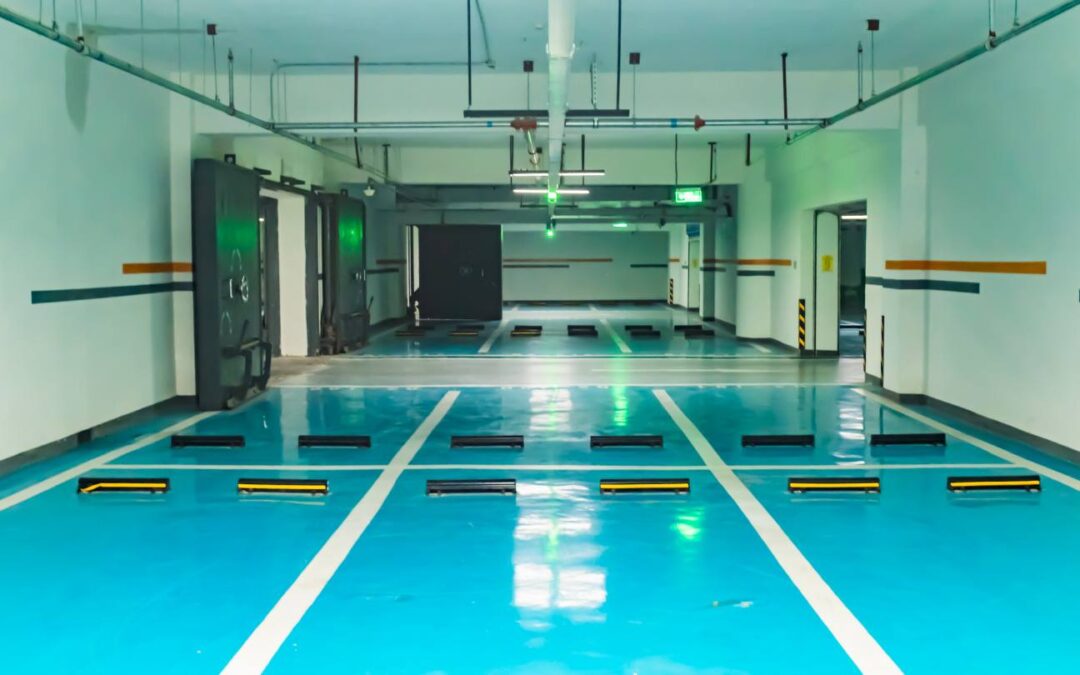
Epoxy garage floor coatings are the perfect option if you require a high-performance garage floor that is smooth, durable, and can support significant weight. Epoxy flooring is the answer to your concrete floor problem, and it is specifically designed for commercial and industrial settings.
Professionals who install epoxy garage floors will patch up any damage or flaws in the subfloor before sealing and painting it. An epoxy coating can last for years when applied by a trained garage flooring contractor.
What Is Garage Epoxy Flooring?
An epoxy garage floor is a special resin coating placed on concrete floors to make them more durable and aesthetically pleasing. This flooring is great for home and business garages because of the various colours and textures.
Epoxy Floor Installation
Professional epoxy installers have perfected the most efficient methods, using the highest-quality epoxy flooring products. This article will explain their methodology.
Concrete Preparation
Preparing the concrete properly is crucial for a successful epoxy floor installation. Use a diamond grinding procedure that cleans and profiles the concrete to create a rougher surface. Since the machinery may be hooked to a dust-collecting vacuum, the process generates no dust.
Acid etching and high-pressure water cleaning are two methods that some contractors choose. The epoxy still chips, peels, and flakes even after these preparation steps are taken. By reducing moisture and facilitating the epoxy’s penetration into the concrete, floor grinding speeds up the installation process. It helps the epoxy and concrete forge the chemical and structural linkages essential to the floor’s durability. The contractor will use epoxy patching material to repair any damage. There aren’t many irreparable nicks and chips.
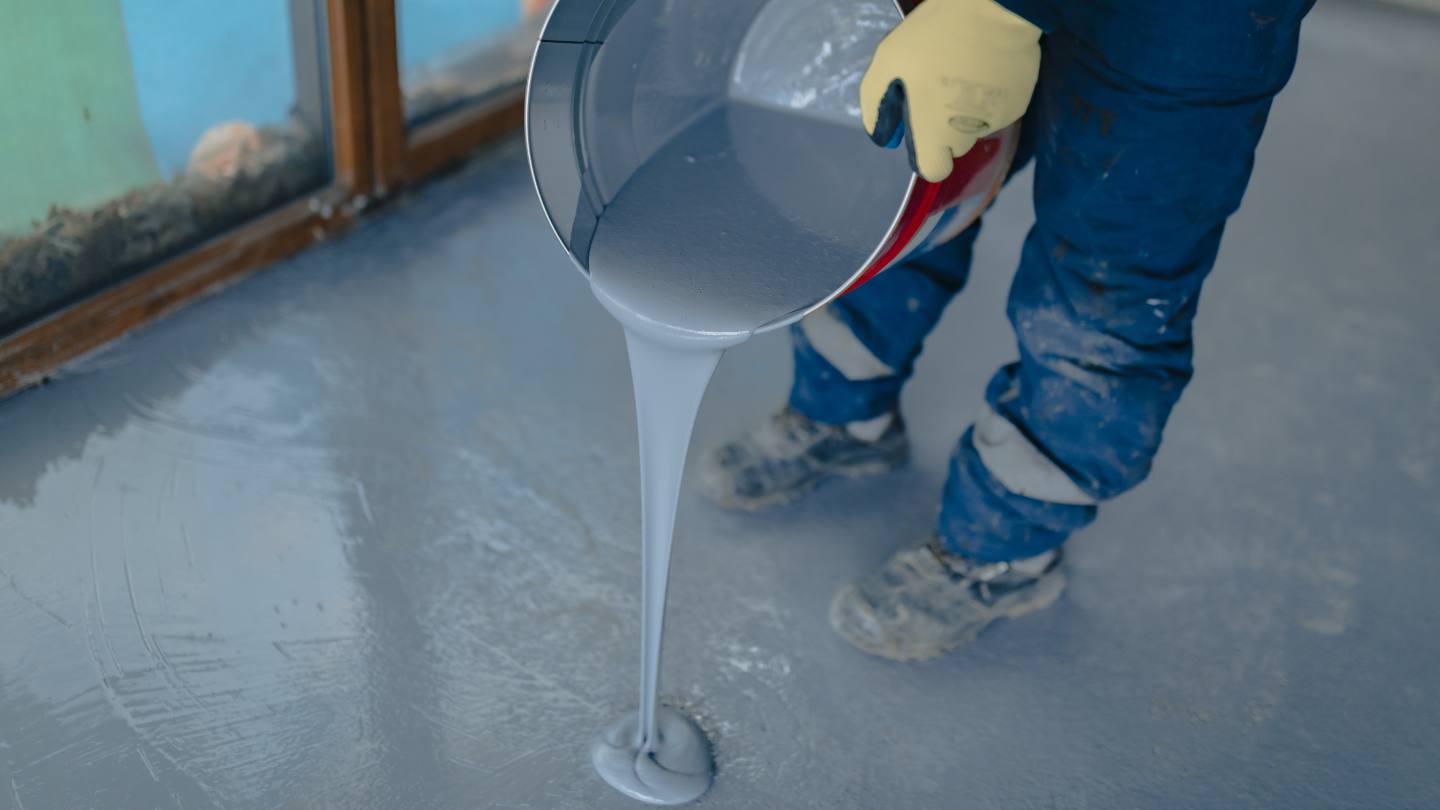
Primer Application
Priming the floor before applying epoxy is essential, especially in high-traffic areas. The floor’s finish should be suitable for priming after it has been ground. No oil, filth, or dust can be present on the surface. Any dirt or dust preventing the primer from sticking can be removed with a bare concrete cleaning solution.
Use a roller or a spray can to apply thin coats of primer to the surface evenly. The contractor will take precautions to prevent puddling by not over-coating. By penetrating the concrete, the primer coat offers a stable groundwork for the subsequent epoxy coat. Industrial-grade, low-viscosity epoxy provides superior penetrating and bonding to concrete slabs.
High humidity will extend the primer’s dry time, so plan accordingly.
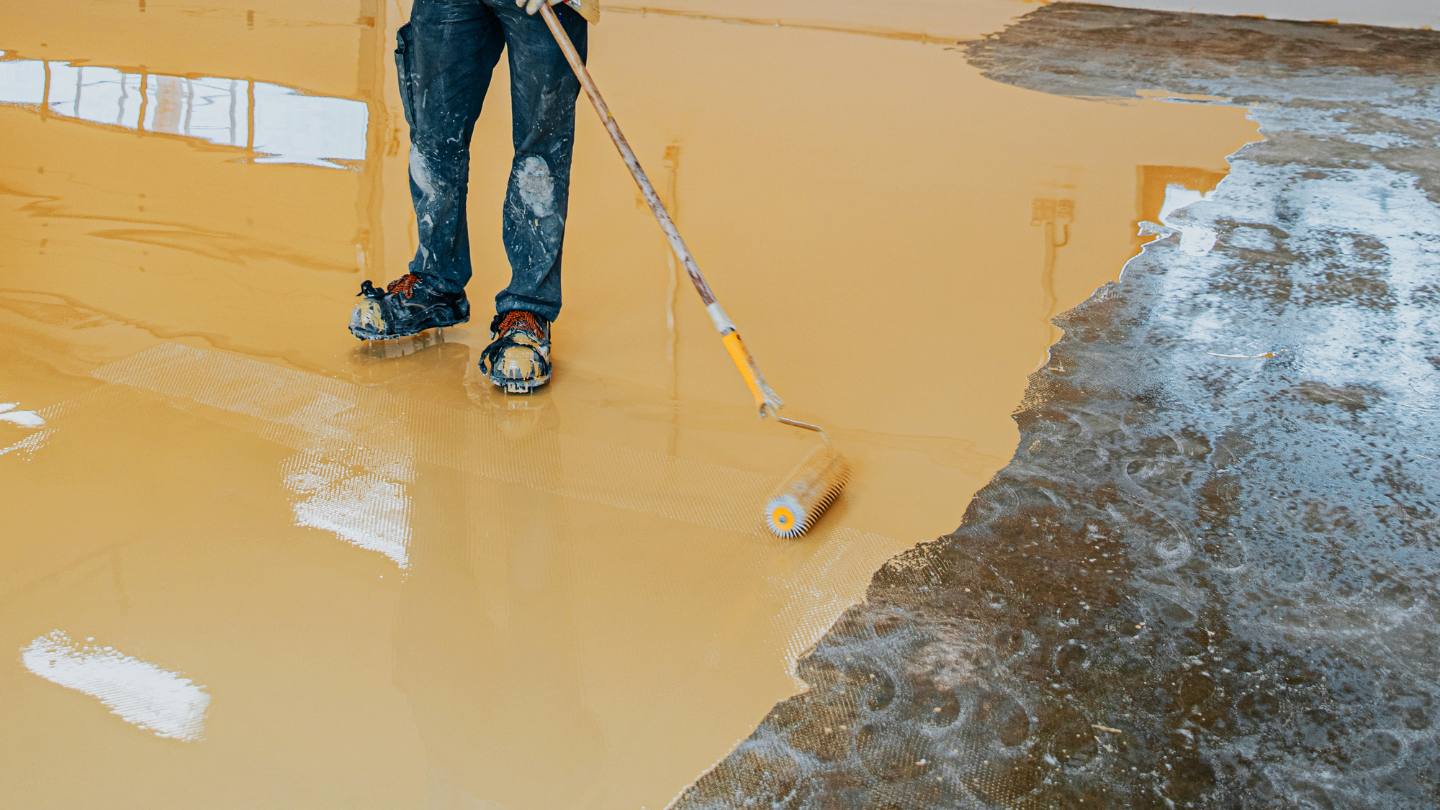
Applying Epoxy Paint
After the primer has dried, the contractor will check the surface for imperfections and clean it up. At that point, he’ll mix up the high solids, build epoxy paint, and apply the first of many layers. Avoid a lumpy appearance by applying the coats thinly and uniformly. A thicker coating than the primer.
The proper floor colour is achieved with the help of primer and epoxy paint. Two or three coats are advised for most floors. However, the amount of coats depends on personal choice.
Protective Epoxy Sealant
Apply a final coat of sealant with a paintbrush. The floor’s lifespan can be increased by using a sealer since it offers a tough coating. The sealant should be mixed thoroughly. Seal the floor and give it at least 24 to 36 hours to cure. Stay fully out of the way of pedestrians and drivers.
Epoxy Flooring Advantages
Durability
Epoxy’s longevity is arguably its most appealing feature for use in garages. Your garage floor’s ability to support weight and endure wear and tear will be much enhanced after being coated with epoxy. You may rest easy knowing your epoxy floor coating will not fracture or chip even if you accidentally drop heavy equipment.
Aesthetic
With an epoxy coating, even the most boring and unattractive cement block can be converted into a work of art. The coat comes in a wide range of styles and colours, making it easy to find one that fits your existing decor. Different coatings are also available. The benefits of epoxy coating for garage floors and garages are numerous. However, it would help if you looked professionally at your garage floor before making any big changes.
Resistance
Floors coated with epoxy are impervious to gasoline, bleach, cleaners, lubricants, transmission fluid, and everything else you can throw at them. Because of this, they find widespread application in the automobile sector. Epoxy floor coating is resistant to most substances, water, and fire. Because of this, the floor won’t be damaged by the numerous liquid accidents in garages.
Safety
Epoxy has many uses, but one that often gets overlooked is how it increases visibility within a garage by reflecting lights. Epoxy floor coating is also fireproof, nonslip, and resistant to temperature swings. As a result, you and your loved ones can conduct any necessary garage work without risk or discomfort.
Typical Errors Made In Diy Epoxy Flooring
Avoiding the cost of a professional’s services can result in costly repairs. The following are common blunders made by do-it-yourselfers.
Shortcuts Used During Floor Preparation
Your garage floor’s concrete must be completely clean for the epoxy to adhere properly. The top layer of concrete must be removed for the epoxy floor sealer to adhere properly. It’s common for do-it-yourselfers to mess up the floor cleaning or the concrete scoring. Both of these factors will cause adhesion concerns.
Poorly Mixed Epoxy
If you want the epoxy to be set up uniformly across the floor, mix it thoroughly. Do-it-yourselfers often need help to get the desired result. This causes issues with adhesion and requires costly repairs to be made.
Overly High Concrete Moisture Levels
This happens frequently when freshly poured concrete is covered with epoxy before it has had enough time to cure. Epoxy coatings tend to bubble and shatter when applied to damp concrete.
Allowing Exposure To Sunlight
Your epoxy may develop air bubbles and change colour if it is subjected to direct sunshine or UV rays while being applied. Even after the resin has hardened, prolonged exposure to sunshine or UV light will cause the surface to discolour.
Stretching Out The Epoxy
Extending the epoxy to cover the entire floor when you’re out can weaken the coating, reveal colour differences, and make the surface considerably less glossy than it otherwise would be.
Advice On Choosing A Qualified Epoxy Garage Floor Installer
Conduct Research
There is a wide selection of epoxy garage floor finishes to choose from. Be careful to do your homework before settling on a garage floor covering. This can help you eliminate potential installers who need to utilise the desired coating.
Read Feedback From Customers
One of the best ways to determine whether or not a company can be trusted is to read reviews and testimonies about it online. It’s the quickest and easiest way to test the legitimacy of the company’s claims about the product’s quality.
There are contractors whose websites feature verified consumer reviews. Checking the company’s social media profiles and Google reviews is also recommended. It should be a warning sign if most company reviews are negative.
Review The Company’s Previous Projects
Most reputable garage floor epoxy contractors will feature examples of their work in a gallery on their website for potential customers. Visit these exhibition spaces to judge the quality of their work for yourself. Focus on their relevant experience working on projects like the one you want. This will let you know if the company is up to taking care of your garage.
The Advantages Of Professional Garage Floor Epoxy Installation
Installing an epoxy flooring system is a great method to improve the look and usefulness of your garage. Due to its long lifespan, low upkeep, and eye-catching aesthetic, epoxy garage flooring has exploded in popularity recently. However, having a beautiful epoxy garage floor would help if you had more than high-quality supplies and DIY skills. In this piece, we’ll discuss why working with an experienced epoxy flooring business is in your best interest on your next garage flooring project.
Experience And Skills
The knowledge and experience of a professional epoxy flooring firm is a significant benefit. Epoxy garage floor installation is a complex operation requiring experience and expertise. Professional installers know what questions to ask to determine what kind of epoxy solution will work best for your garage floor. Depending on the concrete type, the expected volume of foot traffic, and the intended aesthetic, they may advise you on the most appropriate epoxy method.
Superior Materials
A reputable epoxy flooring installer would never use anything but the highest quality products on your garage floor. Epoxy coatings, primers, and sealants of a calibre not easily obtained by the general public are at their disposal. The epoxy garage floor professionals employ will be very resistant to damage from chemicals, impact, abrasion, and foot activity.
Effective Surface Preparation
For a successful garage floor epoxy application, surface preparation is key. Professional epoxy flooring firms know the value of a well-prepared surface regarding adhesion and longevity. They will examine your garage floor closely for problems like cracks and pits before fixing them if necessary. To ensure a good bond, the surface must be prepared for the epoxy coating by either diamond grinding, shot blasting, or acid etching.
Efficiency Of Time And Money
Do-it-yourself epoxy garage floor installations may appear interesting initially, but they often become more trouble than they’re worth. Employing a professional epoxy flooring company ensures that the task will be done promptly without sacrificing quality. They can do everything from cleaning the surface to applying the epoxy coating and any additional topcoats or ornamental features. Time is money, and DIY mistakes can add up quickly, so hiring experts to get the job done right the first time makes sense.
Options For Personalisation And Design
There is much leeway in design and customisation when working with epoxy garage floors. Installers can guide you through choosing between various design options, including solid colours, decorative flakes, metallic finishes, and custom logos. They have the creative eye and technical knowledge to design epoxy flooring that improves the look of your garage and harmonises with the rest of your home’s decor.
Increased Safety
Injuries from slipping and falling in garages are common, especially on moist floors. Installing an epoxy garage floor by a professional can substantially improve the security of the space. Epoxy coatings produce a smooth, nonslip surface that is great for walking in any condition, including when the floor is damp or oily. Epoxy flooring is also very resistant to chemical spills, which makes it easier to clean and lessens the likelihood of injury from potentially dangerous compounds.
Long-Term Value
Having an epoxy garage floor installed by a professional is an investment that will pay off in the long run. In addition to improving the aesthetics and practicality of your garage, this project will boost the value of your property as a whole. Epoxy garage floors are a home selling point because of their longevity, low maintenance, and aesthetically pleasing design. Investing in expert installation is the best way to get the most out of your epoxy floor and increase your home’s market value.
DIY epoxy garage floor installations may seem appealing, but there are several advantages to hiring a professional epoxy flooring installer. They have the know-how, experience, access to customising possibilities, and the use of high-quality products to guarantee a flawless and long-lasting epoxy garage floor.
In addition to these benefits, having a professional handle the installation can help you save time, boost security, avoid common pitfalls, and increase your home’s resale value. Therefore, to turn your garage into a practical and aesthetically pleasing environment, you should consider having a professional install your garage floor epoxy.
Conclusion
Epoxy garage floor coatings are a high-performance option for commercial and industrial spaces. They make floors that are smooth, durable, and look good. Professional epoxy workers use effective ways to put down epoxy flooring, such as preparing the concrete, applying a primer, and sealing the floor with a protective epoxy.
To make a rougher surface, concrete is prepared by diamond cutting, acid etching, and high-pressure water cleaning. Primer is important, especially in high-traffic areas, and industrial-grade, low-viscosity epoxy penetrates and bonds to concrete blocks better than other types of epoxy.
Epoxy paint is spread out lightly and evenly so that it doesn’t look lumpy. Two or three coats of paint are used to get the right colour on the floor. The number of coats used depends on the person. A safe epoxy sealant is put on the floor, which makes it last longer.
Epoxy flooring has many benefits, such as being safe, long-lasting, attractive, and resistant to gasoline, bleach, cleaners, oils, transmission fluid, and fire. It also makes things easier to see by reflecting light, is waterproof, doesn’t slip, and can handle changes in temperature.
But when people do their own epoxy flooring, they often make mistakes like not cleaning the concrete well enough and not removing the top layer of concrete to help it stick. It is important to hire a trained garage flooring provider to make sure that your floor is put in and kept in good shape.
To get an epoxy garage floor that looks good and lasts a long time, you need to mix the epoxy well and avoid problems like badly mixed epoxy, too much moisture in the concrete, exposure to sunlight, and stretching out the epoxy.
To find a good concrete garage floor installer, you need to do some research, read customer reviews, and look at their past work. Professional epoxy flooring companies have a lot to offer, such as knowledge, better materials, better surface preparation, better use of time and money, the ability to make changes, more safety, and value over time.
If you don’t mix the epoxy right, it won’t stick well and will need expensive fixes. When applied to damp concrete, too much water in the concrete can cause bubbles and cracks. Sunlight or UV rays can change the colour of concrete. Also, stretching out the epoxy can make the covering weaker and show where the colours are different.
A skilled epoxy flooring business will use the highest quality products, such as epoxy coatings, primers, and sealants that are resistant to damage from chemicals, impact, abrasion, and foot traffic. Surface preparation is very important for a good epoxy application, and they can look for cracks and holes in your garage floor and fix them if they find any.
Having professional put epoxy flooring not only makes your garage look better and be more useful, but it also raises the value of your home as a whole. If you pay for professional installation, you can get the most out of your epoxy floor and raise the value of your house.
Content Summary
- Epoxy garage floor coatings offer a high-performance, smooth, and durable surface.
- The coatings are suitable for both commercial and industrial settings.
- Professionals fix any subfloor damage before applying the epoxy coating.
- A professionally-applied epoxy coating can last for years.
- Epoxy flooring adds aesthetic value with its variety of colours and textures.
- Professional epoxy installers use high-quality products for optimal results.
- Proper concrete preparation is crucial for successful epoxy floor installation.
- Diamond grinding is employed to create a rough surface for the epoxy to adhere to.
- Floor grinding helps in the speedy installation and longevity of the epoxy flooring.
- The contractor uses epoxy patching material to fix any minor floor damage.
- A primer coat is essential, particularly in high-traffic areas.
- Industrial-grade, low-viscosity epoxy offers superior bonding to concrete slabs.
- High humidity may extend the drying time for the primer.
- After priming, the contractor applies high solids, builds epoxy paint.
- Two or three coats of epoxy paint are generally recommended.
- A final sealant coat is applied to enhance the floor’s lifespan.
- The sealant needs 24 to 36 hours to cure fully.
- Epoxy flooring offers unparalleled durability for garages.
- It can withstand gasoline, bleach, cleaners, and other chemicals.
- Epoxy flooring is also fire-resistant.
- Epoxy coatings improve garage safety by reflecting light and offering a non-slip surface.
- DIY epoxy floor installations can lead to costly errors.
- Common DIY mistakes include improper floor preparation.
- Insufficient mixing of epoxy can result in poor adhesion.
- Applying epoxy on damp concrete can lead to bubbling and cracking.
- Direct sunlight can cause air bubbles and discolouration in the epoxy.
- Extending the epoxy too thinly can weaken the coating.
- Research is essential when choosing a professional epoxy garage floor installer.
- Customer feedback and reviews are useful for gauging a company’s reliability.
- Reputable contractors often showcase their previous projects on their websites.
- Professional installers possess valuable experience and skills.
- Professionals use high-calibre epoxy coatings, primers, and sealants.
- Effective surface preparation is a hallmark of professional installers.
- Hiring professionals is efficient in both time and money.
- Professionals offer various design and customisation options.
- Epoxy floors installed by professionals are less likely to lead to slip and fall injuries.
- Professional installation adds long-term value to your property.
- Professionally installed epoxy floors are a selling point when listing a home.
- DIY epoxy floors may lack the durability and finish of professionally installed floors.
- Epoxy flooring is resistant to temperature changes, making it versatile.
- Professional installers know how to match the epoxy flooring with your existing decor.
- A well-applied epoxy floor won’t chip even under heavy equipment.
- Epoxy floors are easy to clean and maintain.
- Professionals can recommend the best epoxy solution for your specific garage floor needs.
- Employing a professional eliminates the risk of common DIY pitfalls.
- Epoxy floors are not just practical but also aesthetically pleasing.
- Hiring a professional ensures that the job is done right the first time.
- Professionals take necessary precautions to prevent issues like puddling during the installation.
- Properly mixed and applied sealant ensures a tough and long-lasting epoxy floor.
- Hiring a professional for your epoxy flooring increases your home’s resale value.
Frequently Asked Questions
What Are The Benefits Of Epoxy Flooring In A Garage?
Due to its durability and ease of cleaning, epoxy is a great garage flooring option. This type of flooring can be washed with soap and water without causing damage. Besides being resistant to stains, epoxy floors can be easily cleaned of oil and gasoline without any permanent marks.
What Is The Difference Between Professional And Diy Garage Epoxy?
A typical DIY garage floor coating will be applied at most five mils, whereas a coating from the pros will be anywhere from 15 to 30 mils or three to six times as thick as the DIY kit in terms of coating quality. The epoxy contractors use a 2:1 mix of epoxy and a harder.
How Effective Is Epoxy Flooring?
Epoxy is a great flooring solution that offers many advantages over other options. It is durable, water-resistant, and slip-resistant, making it an ideal choice for high-traffic areas. Epoxy floors can also be customized to create a unique look for your home or business.
How Long Does A Professional Epoxy Garage Floor Last?
How long does garage floor epoxy last? Depending on the additives in a coating and the levels of foot traffic, drop impact, wear from vehicles in space and other factors; an epoxy garage floor coating can last between two and ten years with proper maintenance.
Is Epoxy Flooring Better Than Tiles?
However, epoxy flooring is far and away more durable than tile flooring. In the home, it is relatively common for a tile or two to crack over time, particularly with high footfall – but this is no problem with epoxy flooring.